A LITTLE PRACTICE
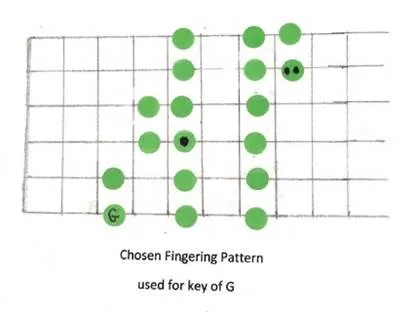
There are basically three ways to practice. (1) Practice playing the fingering pattern using the correct fingers . This does not need to be laborious or time consuming because the pattern will be placed on the fretboard. (2) Practice finding the correct notes of familiar songs on the fingering pattern. This is best done in a quiet place where you will not be interrupted. And (3) jamming with a band, radio, recordings, or videos. To jam with the radio, recordings, and videos, you will first have to determine what key they are playing in. The easiest way to do this is to slide your finger up and down the high E string to find the same note they are using as the root note of the song. Especially listen to the first and last note of the song. For example, if the root note they are using is with your finger just behind the third fret on the high E string, the root note would be G. This means you must play on the green fingering pattern so you will also be playing in the key of G.


Immediately below we will start learning the background and the setup for Color-Coded lead guitar playing. The explanation is detailed but the concept is very simple. In my method, we put colored stickers on the guitar fretboard so you don’t have to remember where to put your left-hand fingers. My method is very simple and can be learned by someone who has never played the guitar. This method produces only the melody line which is a series of single notes. It is used when you want to play the melody and other musicians, recording, or the radio plays the chords (background) for you.
WHAT IS A FINGERING PATTERN, AND WHY WE MUST HAVE ONE?
A fingering pattern is just a representation of part of the guitar fretboard showing where you put your fingers to play a musical scale. There are 126 notes on the guitar fretboard. But to play most songs, only seven notes of the 126 notes, sound pleasant and are correct. A fingering pattern shows you where those seven notes are, so you can find them in a fraction of a second.
FINDING A FINGERING PATTERN THAT IS THE SAME FOR ALL SEVEN MUSICAL SCALES
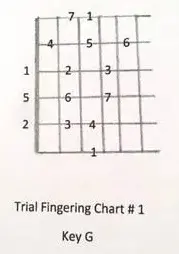
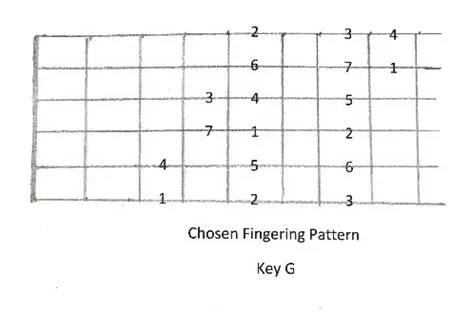
The fingering pattern that I chose for this course is the same pattern used in the excellent online Ultimate Guitar Course. When I saw the fingering pattern they used, I did not know if it was the best fingering pattern. So, I experimented with different fingering patterns. For example, Trial Fingering Pattern # 1 below is an unacceptable fingering pattern because the G, D, and A strings are played open. When this pattern is transporter anywhere on the fretboard, those strings have to be fretted, which changes the fingering completely. After experimenting I came to the conclusion that the pattern chosen here below is the best. What exactly do I mean when I say the fingering pattern is the same for all musical scales on the guitar. I mean that the placement of your fingers on the fingerboard is the same relative to each other in all keys, and that each position is played by the same finger in all keys. This is important because this sameness allows subconscious (muscle) memory to develop which results in your being able to play songs with little or no concentration on the fingering. This lets you concentrate solely on finding the melody on the keyboard that is in your mind.

The chosen fingering pattern is shown below here. The scale starts on the low E string. Each of the strings is fretted in three places; and the pattern's range is a full two octaves plus four notes. There is minimal horizontal movement of the arm along the fretboard and most importantly, this pattern remains the same (with slight modification) for all keys!


With my color-coding you do not have to memorize this impossible fingering pattern! You mark it on the fingerboard in colors so you can see it - not memorize it. We use a different color for each key. This is my main innovation that makes this method possible.
The purpose of having any method to play lead guitar is to reduce the time for you to find the next note in the song. We reduce the time by using the musical scale of the key of that song which has only 7 notes. What we do is place those 7 notes on a fingering chart which is the chart with the green dots just above this paragraph.
Let's now look closely at the Chosen Fingering Pattern. You will notice that the lower sounding two strings (E and A strings) of the fingering pattern have three dots for your fingers that are evenly spaced. The three dots are played with your forefinger, your index finger, and your little finger respectively. The middle two strings are marked identically to each other, but they are both shifted one fret to the right relative to the lower two strings and the middle note is slightly to the left. You play these notes with your forefinger, your index finger, and your little finger respectively. The upper two strings are marked identically to each other, but they are again shifted one fret to the right relative to the two middle strings. The middle note is shifted to the right slightly. You play these three dots with your forefinger, your ring finger, and your little finger respectively. Do you think that you could remember the pattern I just described? Do you think that you could remember that pattern while playing a fast song? The true answers are "no" and "no". But having to remember that pattern is what is asked of you by some lead guitar courses. This impossible memory task is why I sought a simpler way, which resulted in a way not to have to remember the fingering pattern.