THE COLOR GIVEN TO EACH MUSICAL KEY
We are going to eventually put different colored markers on the fretboard of the guitar to designate each of the seven major musical keys. But we will start now with only the key of G. Strangely enough, the human mind can concentrate on any one of the colors and not be concerned with the other six. By assigning a color, one instantly knows what key you are playing in. It is not necessary to memorize the color assigned to each musical key because the color and its musical key are written on the keyboard on the first colored marker of each key. For example, for the key of G, the first note of that scale will get a green marker with a G printed on it. However, with my memory aids below you will be able to learn the color assignment for each key in a couple of minutes, so I suggest you do learn the color assignments here.
Here is the listing:
A = Apples = red
B = Blue
C = Citrus fruit = yellow
D = Dark = black
E = Every color = White
F = Fudge = Brown
G = green
COLOR-CODE
THE GUITAR PICK TOO
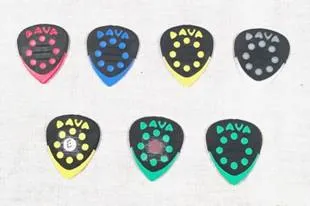
Color-coding the picks is not a requirement, but since we are playing lead guitar in a musical key that is represented by a color, why not have a guitar pick of the same color as the key you are playing in. Playing with a pick of the same color focuses your brain on only that color on the fretboard, and if you ever forget what key you are playing in, just look at your pick. In some arrangements for a jazz band there will be several measures rest followed by a change of key. And the key may change several times. In this situation, colored picks can be useful. I have tried many picks, trying to find one that does not slip in my fingers or requires wetting before each song to make it stick to my fingers. The best pick by far for me is the DAVA picks that have a special rubber pad on each side of the plastic pic. By happy coincidence these are the only picks that I have found that come in multiple colors. Their six pack of picks provides a red pick for the key of A, a blue pick for the key of B, a yellow pick used for the key of C, a dark purple pick for the key of D (black), a green pick for G, and no pick for the key of E or the key of F. I bought some extra yellow picks and put a brown marker on one for the key of F, and a white marker on the other pick for the key of E. (6 pack available from MusicianFriend.com for $5.99)

Red pick for key of A; blue for B; yellow for C; black (dark) for D; white for E; brown for F; and green for G.
ATTACHING COLORED MARKERS TO THE FRETBOARD FOR THE KEY OF G
You will need scissors, a piece of green paper from a magazine or newspaper, a single round hole-punch, ½ inch wide Scotch tape, a black ballpoint pen, and a dinner knife. (Watch video now of how to place the markers under the strings.)
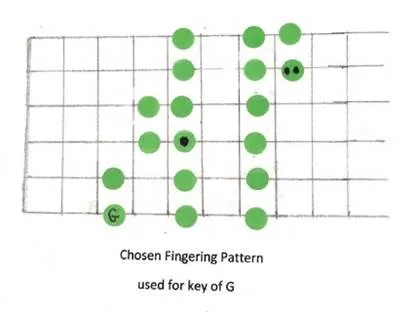
(Do not loosen the strings or take them off the guitar.) Punch out round markers from the green paper. Print G on one of the green markers. Touch the sticky side of a 1/2 by 1/2 inch piece of tape to the middle of colored side of the circle with G written on it. Hold the edge of the tape with your left forefinger and thumb. Pass the dinner knife blade under the stings between the second and third fret. Then stick the edge of the tape to the tip of the dinner knife. Release the tape from your left hand and with the back of the dinner knife against the strings, slowly pull the knife away from your left hand stopping with the colored sticker under the low E string. Press the marker onto the fretboard and withdraw the knife completely. Press on the marker again to adhere it to the fretboard. Be sure that no part of the tape touches a metal fret. Go through this same process placing the green marker with one dot at its proper position. This one dot marker indicates the end of the first octave. Repeat these steps to place the marker with two dots in its proper place. This marker indicates the end of the second octave. I do not place markers on the guitar when the finger positions are three notes spaced evenly like on the lower two strings (A and E) on the diagram of Chosen Fingering Pattern used for the key of G on the right of this page. Three evenly spaced dots are very easy to remember. Then put the remaining markers in their proper places. We now have the fretboard prepared to play in the key of G.
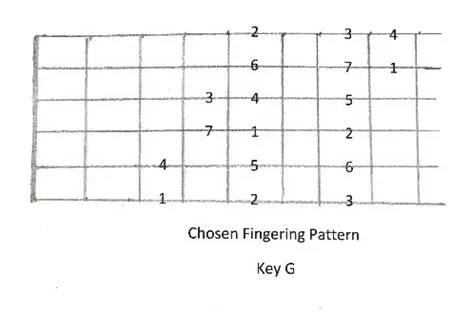
The two charts below are exactly the same except that the chart on the left marks the positions with numbers and the one on the right marks the positions with colored dots. You see that numbers start with the root note of the scale, and after the 7 notes, the scale then repeats itself starting again with number one. These numbered positions are the same for all keys that use this fingering pattern. (If we had used letters instead of numbers for the notes, the letters would be different for each scale and would be impossible to remember.)
Playing in only the key of ( G) allows you to learn this playing method and to play any song.


I advise you to practice in the key of G before adding other markers to the fretboard. It is easier to play songs on the two lower pitched strings because the spacing of the finger positions is equal and is the same on both strings. Some have tried to assign a different emotion to the sound to each number on the scale, but I had little success with that.