Four other ways to play lead guitar!
The color-coded method of playing lead guitar that I have shown you previously in this website is by far the fastest and easiest to learn. My method produces a one note melody (so it could be called the mono method). However, my method is not the only way to play lead guitar. Let me show you four other methods. These are:
- The duo method. This method is considerably harder and requires some preparation and other musicians to supply the chords (background). It produces two or more lead notes in harmony.
- The On-Chords method. In this method you are playing only the melody notes, that is, never strumming the chords. Instead of strumming, you are just putting your fingers in the hand position of the most common chords in that key to aid you in finding the melody notes.
- The Simul method. Here you are playing simultaneous the lead guitar part and the chords. And
- The steel guitar method. Here you produce the lead notes by sliding a steel bar along the strings to vary their length making all the notes of the scale. This unique sound is widely used in country and Hawaiian music.
Let’s look at each of these three methods in detail:
- The duo method. Here you are playing at one time, two lead guitar notes (occasionally more) that are in harmony. This is more difficult, but this is the most beautiful method to hear. It uses the two highest pitched strings and occasionally the third. These high pitches strings are the easiest to reach with your left hand and are the best for cutting through the sound of the other instruments. This Duo method is not in the books. As shown here, this method was conceived by my guitar teacher, Vic Tommarchi, of Naples, Florida.
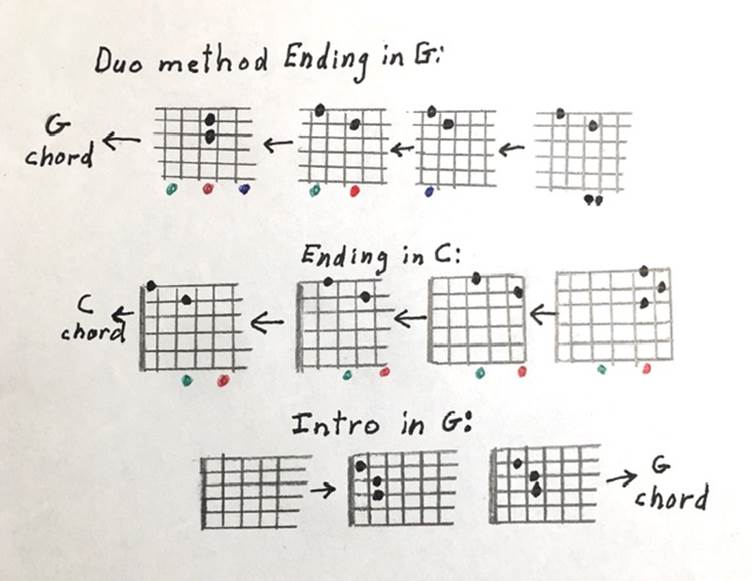
The simplest way to utilize the Duo method is for intros and endings of songs. Let’s look at that usage first, and then we’ll explore playing the melody later in this section. Any song is made better with a nice intro and a nice ending. I am going to draw for you a few of Vic’s intros and endings in different keys.
About the only way to explain the Duo method for playing the melody is with a video. In this video of “Back Home Again” I played the steel guitar, keyboard, and sang the vocal harmony into an 8-track recorder. I then played that recording while I sang the melody and played the lead guitar live for the video. During the instrumental break in the middle of the song, I used the Duo method to play the melody.
To prepare a song to be played by the Duo method, you first write out the words and chords on tablature notation paper (music stores sell 6-lined tablature paper for guitar music)
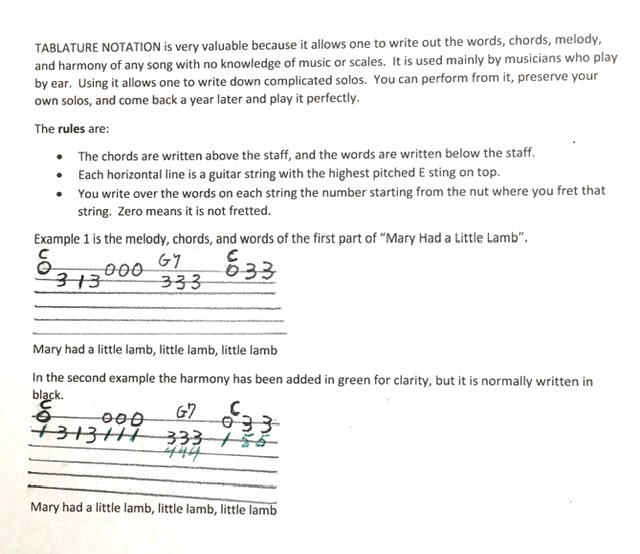
Then you search by ear using trial and error to find the lead line. Write the lead line on the tablature notation paper fitting it over the chords. Then search by ear using trial and error to find the harmonizing note on the B string. You can also try playing the chords (C, D, or F) that finger both of the upper two strings with the highest pitched note on the chord as the same note of your melody note. Since these chords finger each of the three highest pitched strings, they can be slid and used all the way up the neck. Which note sounds correct? Use that one. If you should need a seventh chord, try D7 or A7 since they utilize the upper four strings and can be slid all the way up the neck. It is best to write down the harmonizing note using the tablature method so you don’t have to hunt for it ever again. Later when playing the song, you can play it from memory or play it from the tablature notation sheet you made.
As you can see, this method of playing lead requires that the background rhythm chords come from some other musician, and there is much preparation and time required of you. But, again, Duo is the most beautiful to hear. Compare it to a solo singer verses two singers singing in harmony. The video here of a song I wrote about a meditation garden at my church. I am playing or singing the vocal parts and the keyboard and lead and rhythm guitar. The intro and the break is the Duo method and there is also some steel guitar lead.
2. Playing “On the chords” (On-Chords) method. (In my color-coded method of playing lead guitar taught in the 5th through the 9th bullets of the Table of Contents one uses a musical scale pattern to aid you in finding the next note of the melody.) However, when using On-Chords one uses the hand positions of the commonly used chords in that key to aid you in finding the next note of the melody. To play in all keys with On-Chords you learn to play in only the keys of C and G. All the other 10 keys are produced by using a capo. When playing in the key of C, a capo is used to raise the sound to the key of C#, D, D#, E, and F. And when playing in the key of G, a capo is used so they sound in the keys of G#, A, A#, and B.
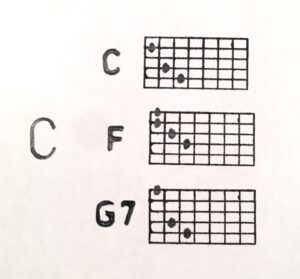
The three chords most frequently used in the key of C are: C, F, and G7.
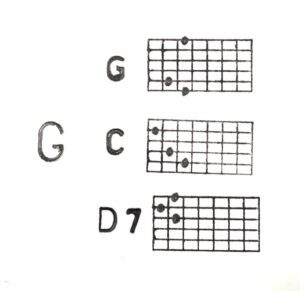
The three chords most frequently used in the key of G are G, C, and D7
With the On-Chords we are playing only the melody notes. On-Chords has these advantages when compared to my color-coded method for playing lead guitar:
- The distanced the fingers move and the distance the wrist moves is less using the On-Chords method.
- Because of (a), songs can be played faster using On-Chords.
- For players who already know basic chords, learning to play lead with On-Chords is a more natural progression.
- On-Chords encourages improvisation and makes it easy. One just looks down at the chord you are playing and know that every note in that chord can be used for improvisation and will sound good.
- Improvisation makes your music more interesting because the audience may have just heard the straight melody from the vocalist or another player.
- On-Chords is the bases for playing Simal (to be described later).
(It should be remembered, however, that using my color-coded method to play lead guitar has the unique advantages of needing no knowledge of chords and the note you are looking for is in the same position for every key.
I will not illustrate how On-Chords is played just now because that method is completely illustrated in the Simul method video below except in On-Chords, one never strikes the chord. The chord is just a tool in finding where is the next note of the song’s melody.
- The Simul method. Let us say that you wanted to play an instrumental break within a song you alone are singing and playing on the guitar. You could try playing the melody only or the chords only, but that would sound too empty to be considered an instrumental solo. This simply means that when alone, you can’t play an instrumental solo unless you know how to play the melody and the chords Simultaneously. The best way to do this is by playing what I call Simul with my simplifications of it (explained later). My most important simplification is we will learn to play Simul in only the key of C and G, our most familiar keys. Playing Simul in the other 10 keys will be done by moving the keys of C and G with a capo (a clamp on the neck of the guitar that shortens the strings and raises the pitch).
In the video we will show now, I used the song “Have I Told You Lately That I Love You”. If you need a reminder of how that song sounds, I played it in the video on this website found in the Table of Contents under ‘Adding Markers to the Fretboard for the Other Keys’. Also in the video to be shown now, I use the song “I Can’t Stop Loving You.” If you want a review of that song, I play it on YouTube. Here is the link: https://youtu.be/3nBBYOzRqmQ
We’ll now show the video of how to play Simul. Here are the main points covered in the video:
- You hold down the chord until you play the next chord (your hand is not moving up and down the neck of the guitar.
- You pick out every note of the melody.
- Your next note is probably under your fingertip of the chord of that note.
- You strum the chord only when the melody note is sustained.
- You take steps to avoid “muffling” when necessary.
Most of us don’t have a band, the radio, or recordings that we can call on any time we want to perform. But with Simul you don’t need a band because you are also playing the band’s part as chords. You will rarely see Simul on TV or YouTube except from the likes of Chet Adkins or Glen Campbel. Simul is difficult. Many professional singer/guitar players never learn it. After all, they have a band to play the instrumental parts of songs. But for a lone singer/guitar player, Simul is the most fun way to play and makes you sound like a professional. With Simul you become a one-man band. It is impressive. Initially it is difficult, but with practice it flows naturally (especially in the key of C) with little thought as to what you are doing. It is played by ear. When learning a new song by Simul, I don’t write the song on tablature paper because the song flows easy and naturally. Once you can play Simul, you will never play in public again without using it in some of your songs. When you master it, you will have an invaluable musical skill.
Simul is especially valuable as an introduction and as a break in a song (See video of God Bless America), but you can also use only the melody part of Simul to play an instrumental break while the band is playing the chords.
Above is an example of using Simul method to play the break in the middle of the song, and using the Duo method of playing lead guitar to play the ending of the song, Born to Lose.
Born to Lose
Here are the ways that I have simplified Simul so that players who only strum guitars can learn it:
(a) Play open strings as much as possible. This means playing nearest the nut of the guitar or near a capo which serves as a moving nut. Open strings are played with the right-hand pick only. There is no fingering with the left hand.
(b) Almost always, songs are played in the keys of C or G. This means that you don’t need to learn the difficult fingering of the other five keys. C is chosen because it is a very commonly used key on the guitar and the key that most perfectly fits the fingers. The key of G is chosen because it has three open strings.
(c) C and G are also chosen because these keys are several notes apart from each other on the musical scale, meaning that either C or G should put the song in your singing range.
(d) We use a capo (a bar across the neck of the guitar) to put the song into any key you desire. Using a capo is the only way to continue to use the open strings regardless of the key you are in. For example, if you are playing with a band and their music for a song is in the key of A, you would play Simul in the key of G and put the capo on the second fret. Glen Campbell, widely considered the world’s most versatile guitar player, said that he got many jobs because he could use all of his skills (Simul and others) in the rarely used key of Bb. He did that by using a capo. (We don’t use fretboard stickers in Simul because we don’t need them, and there is no way to move the stickers when the capo is used.) There is no difficulty using a capo even the first time you use it.
(e) When you practice, the strong subconscious tendency is to start memorizing the finger positions. This helps especially in the larger jumps in pitch. But one should mainly try to use the sound pitch to find the next note whether it be higher, lower, two notes higher, the same as the note you just played, etc. By using pitch, you will eventually be able to play new songs quickly. Playing slowly in practice is very important so you play and hear the song correctly most often, rather than going fast and most often play and hear your mistakes. Going slowly gives the brain more time to absorb what is correct. Four 15-minute practices are more efficient in learning than an hour’s practice.
(f) You have several landmarks in finding the next note: if the next note goes down or up, it will still be found in the first four frets because all the notes are within the first four frets; when you are play “Simul” your left had is always locked onto the chord that goes with the note you are playing, so if a different chord is used for the next note, look inside that next chord for the note. The melody note is almost always found in the chord being played with that note.
(g) The simplest way to play Simul is the way I showed here, that is, striking both the melody notes and the chords with a flat pick held in the right hand with the thumb and the forefinger as in the videos. The most difficult way to play is using a thumb pick for the melody and four fingers for the chords (Chet Adkins style). Or you could play the melody with a flat pic held with the thumb and forefinger and using the index, ring, and little finger for the chords (Glen Campbell style).
Playing Simul in the key of C is relatively easy because the notes of the melody lie within the chord you are playing. In other words, the melody note is usually directly underneath or being held down by your finger when you are playing the chord.
Here is a reminder of the C scale
Fig. 1
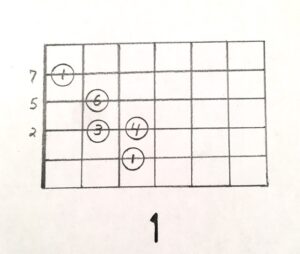
Here is a reminder of the G scale
Fig. 2
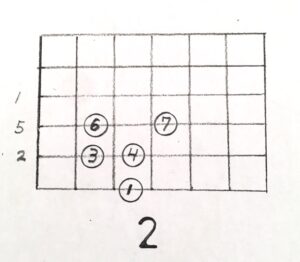
Playing Simul in the key of G is more difficult because the melody note can be too far to reach from the chord
For example, in the key of G one of the most frequently used chords is D7 which requires three fingers held closely together).
Fig. 3
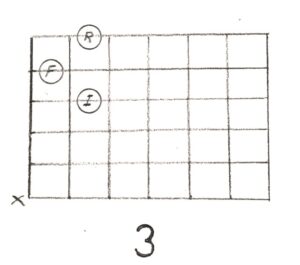
In order to play the 3rd note of the G scale with the D7 chord, we play the note with the index finger and change the fingering of the D7 chord.
Fig. 4
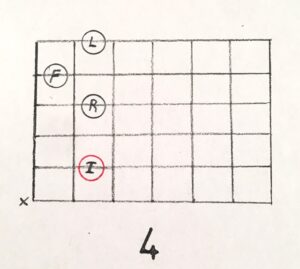
In order to play the 4th note of the scale with the D7 chord we use the little finger to reach the note.
Fig. 5
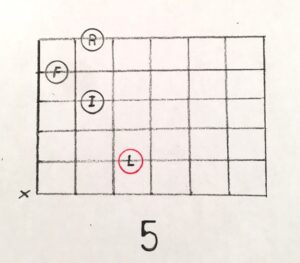
The 7th note in the G scale is frequently the melody note when playing the D7 chord. Unfortunately, it is anatomically impossible to play that note with that chord (your little finger won’t stretch that far).
Fig. 6
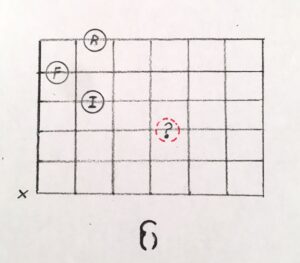
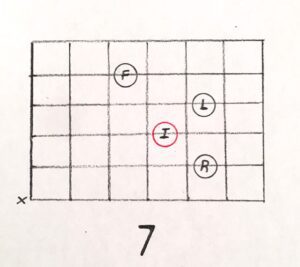
Therefore, to play the 7th note with a D7 chord, we use a substitute D7 chord which contains the 7th note within the chord.
Fig. 7
4. The steel guitar is another way to add lead sounds to your recordings. I mention it here because it only takes about two hours to unpack a new steel guitar, put on the legs, tune it, and learn to play it well enough to get perfect sounds on your recordings. By the sound, I mean the sound of sliding whole chords, not the sound of playing the lead on the steel guitar. You might want to go back to the section on the Duo method to hear the steel guitar in the video of “Back Home Again” or also in the Duo section “UU Garden” to hear the steel guitar. You can buy a nice sounding Rogue RLS-1 Steel Guitar with stand and gig bag at Musicians Friend for $99.99. You also need the steel sliding bar, and a thumb pick to play sliding chords. To play the melody you would also need finger picks. (see Steel Guitar photo).
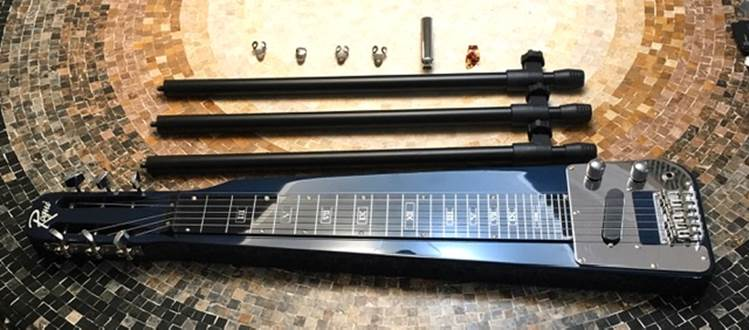
Steel guitar with legs and finger picks and bar above.
The steel guitar uses open tuning, meaning, it is tuned to the tonic (basic) chord of the key you want to use. The photo here shows the open tuning for keys A, C, D, E, and G. Any book like Hal Leonard’s Lap Steel Guitar gives the techniques for sliding chords and for playing the melody.

Open steel guitar tuning.
The steel guitar mentioned above has Nashville Notation marked on the fretboard. This means that the third fret is marked with a Roman numeral III, the fifth fret is marked with a Roman numeral V, the seventh fret has a VII, etc. This allows you to tune the steel guitar to any key, and the playing positions for a song are the same in every key. This means that in every key the tonic chord is open, the subdominant chord is always V, and the dominant chord is always VII.
To play the steel guitar, as the song goes to the subdominant chord, you just slide the bar from IV to V. Or when the song goes to the dominant chord, slide the bar to from VI to VII. Your music will then sound like you added a steel guitar player to your band.
Using a Spanish guitar:
A Spanish guitar has gut or nylon strings and has a wider and flatter keyboard than an acoustic, steel strung guitar. The distance from the two E strings on a Spanish guitar is about 1 5/8 inches. On a steel strung guitar it is about 1 4/8 inches. The nylon strings on the Spanish guitar are bigger and easier to push down and not as sharp on the finger tips. The wider keyboard gives less muffling from the back of the finger on the next lower string making the individual strings easier to hear on a Spanish guitar. It is preferred for classical music and for finger-picking. I’ll use a Spanish guitar in the following looper video.
5. Using a looper which is a pedal effects box that contains a guitar recorder and a foot switch (see photo of Boss PC-1).
You plug your guitar into the input jack of the looper and run a cord from the output jack to your amplifier. Here how it is used. You start singing the melody of a song and playing the guitar background chords and rhythm at the same time that you step for a second on the switch of the looper pedal. The looper starts recording what you are playing on the guitar but does not record your singing. When you again step on the switch it plays the guitar chords/rhythm that you just recorded. While the looper is playing the recording, you can play a lead guitar solo instead of singing it. During this, the audience hears simultaneously the recording you made and you playing the guitar solo live. To stop the looper, you step on the switch twice. If you don’t stop the looper, it will continue to play its recording of the background chords/rhythm repeatedly. Using the looper is especially effective if the rhythm chords are near the nut of the guitar (a lower pitch) and the lead is several frets up the fretboard (a higher pitch) higher using the Duo method (above) of playing lead guitar. Playing low chords and a high-pitched lead is impossible without a looper. Once you have recorded and saved the rhythm guitar part, you can use that recording for practicing, or you can save the recording and use it in your next concert.
Learning to use a looper takes practice and coordination because within the same second you are (a) stopping the verse of a song and starting the chorus, (b) you are switching from playing chords to playing lead, (c) you are moving from near the nut to several frets away, and (d) you are pressing the foot switch.

Using a Spanish classical guitar and a Looper